As a blogger myself, I’m always trying to encourage my peers to create their own online courses. Many bloggers dream of replacing their full-time jobs with revenue they earn online, and courses are a great way to go about that.
But time and time again, I get a bit of pushback from my friends.
Things like, “But Morgan, I have no clue how to go about creating a course—it’d take me months!” or “I’m not a teacher, online courses are not right for me.”
At Teachable, we have a saying, “Anyone can teach, and everything is Teachable.” Getting people to believe that is a bit easier said than done. The one way I have been able to most effectively coax my blogging friends into creating their first online courses?
By reminding them that they’ve already done most of the legwork.
Bloggers are in a great position to create online courses, because chances are they’ve already created a lot of the content that they’ll use.

Why online courses?
Online courses are more profitable than other e-products like ebooks. Whereas people might be willing to pay $25 for an ebook, people are conditioned to pay $100+ for a course. You can make significantly more with a small audience.
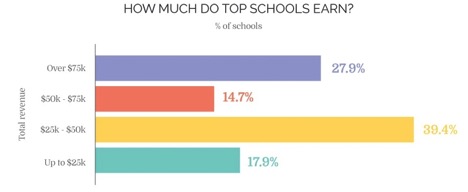
Beyond that, nearly 40% of our top instructors at Teachable, are making between $25,000 and $50,000 a year selling online courses. Those numbers are crazy.
Choosing your course topic
Most bloggers work within a certain niche, or cater their content to a certain audience. Use the content you’ve already created and the audience you’ve already built to help focus in on what you want to create your online course on.
For example, if you’re a parenting blogger, it might not make a ton of sense to create a course on iOs development unless you’ve written about that in the past. On the other hand a course on how to prepare your kid for kindergarten would be a perfect fit.
Look at the content you’ve already created and determine which posts were the most successful. Chances are, your audience has already told you what type of content they like by interacting with your site. Which blog posts have landed the most page views? Which posts got the most shares, or the most people signing up for your email list? Those are the topics you can probably consider yourself an authority on and will be a good starting point while you’re digging for an online course topic.
Once you’ve come up with a list of blog posts that have performed well, group them together. If you’ve niched down within your blog, there should be a lot of overlap.
Word of warning: You can’t be everything for everybody. The biggest pitfall I see people stumble into is trying to create the ultimate course on their topic.
You don’t want your very first course out of the gate to be, “The Grand Ultimate Guide to Everything You Will Ever Need to Know About Guitar.”
It’s easy to want to make the biggest and best course out there on any given topic, but we’ve found that focusing down and solving a highly specific problem, rather than trying to solve every problem with your online course, is better for both you and your students.
So instead of trying to teach everything there is to know about guitar, focus down and teach your students how to fingerpick an acoustic guitar.
Deciding on your topic
Remember: Your online course should serve as a shortcut to an outcome. To decide on your course topic, you must first decide on your outcome.
Your students want to see a tangible result, so figure out what you want that result to be and go from there.
Examples
Result: Going from a garden novice to successfully growing an indoor herb garden
Course: How to grow an indoor herb garden for beginners
Result: Your students successfully negotiate a raise
Course: How to advocate for yourself in the workplace
Result: Your student feels confident using the equipment in their gym
Course: How to become a gym shark in 4 weeks
Turning your posts into an online course
Once you’ve got an idea of what you want your online course topic to be, start by searching your blog archives and open all of the blog posts you’ve written on that topic.
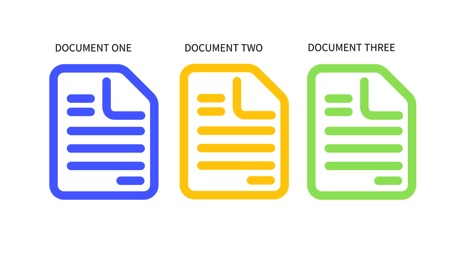
Now create three Google documents:
Document one: copy and paste each relevant blog post into this document so everything is easy to access and in the same place.
Document two: This is your staging area, while you sift through document one you’ll copy and paste unique and relevant ideas here.
Document three: This is where you’ll create your online course outlines.
Assembling your online course
Step one: Start sifting through your first document. For me, this means deleting things that aren’t relevant to my course and copying anything I deem important over to document two.
Document two should be all unique information, so if your blog posts overlap and you mention the same thing in more than one place, just copy it over once.
Step two: Start organizing document two. Here I clean up formatting, round out any incomplete ideas, and start labeling sections so it’s easier to put together into my outline.
Which brings us to…
Step three: Use document three to create a rough outline for your online course. I recommend looking back to when you were first learning and write down every step you took to become an authority in what you’re teaching. Think of the transformation you’re providing, and write down everything someone would have to do (even if it seems insignificant) to get to where you are.
You need to be so detailed here. Even things that seem easy to you now may be trickier for people who are just getting started.
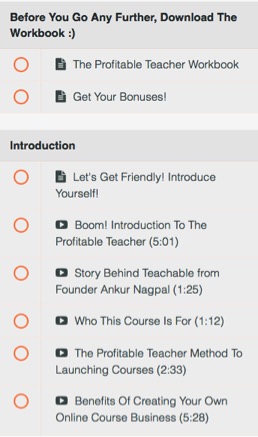
Step four: Group similar steps into sections in document three. On Teachable, your course structure will look like the image below with lectures within sections. Your groupings should reflect that structure.
Step five: Copy your information in document two over to the relevant sections in document three.
Step six: Format each section into a script or game plan. You don’t need to have a video for every single section you created. You can instead add a blog post, a pdf, a sound file, or whatever else tickles your fancy.
When you are creating videos, it’s always a good idea to use the content you pulled from your blog post to format a script. You don’t need to write out what you’re saying word for word, but it’s helpful to have a general outline.
Up until now, you’ve had to do a bit of work to get the ball rolling. But this is where document two will come in to save the day, and hours of your time. You’ve likely already created a good chunk of your scripts, you just need to extract it from blog posts that you’ve written in the past.
Step seven: Fill in the blanks. No matter how much content you’ve created on your blog, there will likely still be a few “blanks” you need to fill in.
Look over the script you made and fill in the holes where you see them. Once you’ve done that, you’ll have your complete working script.
Step eight: Create your slides. Most instructors use slides to accompany their video to keep their audience’s attention and hammer the important ideas. You can create your slides on programs like Google Drive, KeyNote, or PowerPoint, and there are a ton of free templates you can use if you’re not a designer.

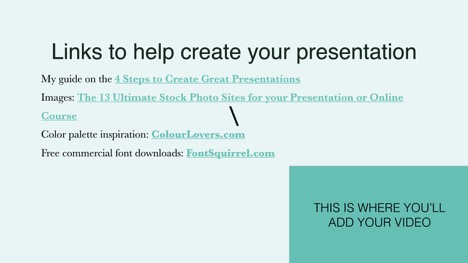
Before you start designing your slides, decide whether or not you want a video element in the presentations. Some people use just slides and a voiceover, while others will choose to create floating head videos that look like this:
Create great video
Once your slides are complete, it’s time to tackle the task of creating great video. Whether you choose to record video of yourself or voice over your slides is up to you. There is nothing wrong with just using voiceover, but to really connect with your audience still let your personality shine through.
For voiceovers, you can use a screen recording program like Camtasia and click through your slides and record your voiceover at the same time. This will help save the hours you’d otherwise spend syncing your slides to your audio.
Selling your course
The other great advantage that bloggers have in the online course world? They already have an audience. Whereas other people may be starting from scratch when it comes to selling, bloggers already have a fan base.
At Teachable, we recommend launching with what we call our Crazy 8 Launch Strategy, but there are dozens of other approaches you can take. You’re a blogger, so you can consider launching your online course with your blog, but I still recommend doing so in conjunction with launching to your email list.
You did it!
Try Platform University!
Want to give Platform University (your one-stop shop for building an online audience) a spin? Get your first week of Platform University for just $1. Cancel anytime.
Try Platform University for Just $1Creating an online course truly isn’t nearly as daunting as it might seem, especially when you’ve already unknowingly done half of the legwork.